Save to Pins
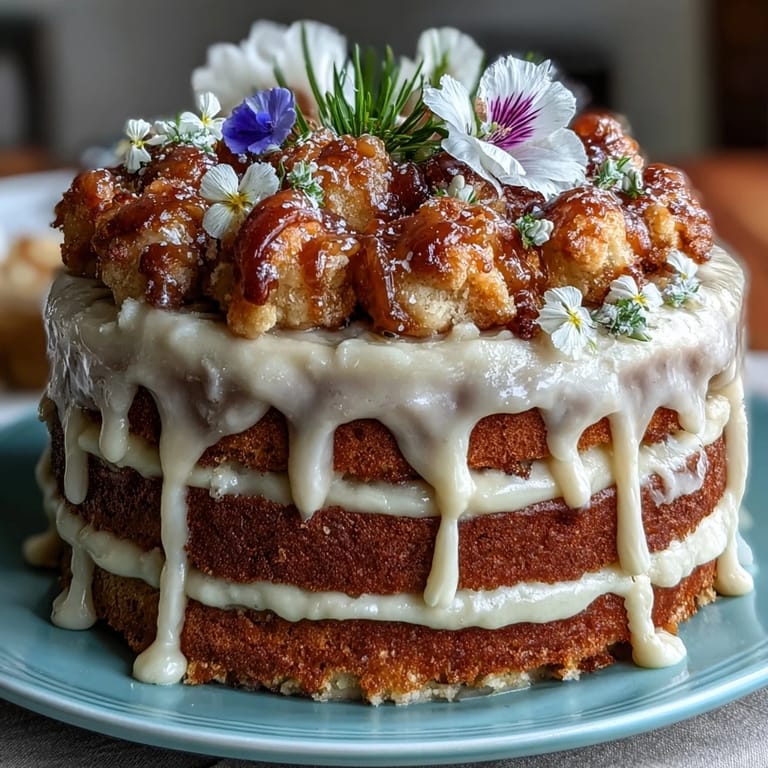
 My niece turned seven on the first warm Saturday of spring, and instead of the usual grocery store cake, I decided to bake something that matched the season—delicate mini layer cakes crowned with edible flowers from the garden. The kitchen filled with the smell of butter and lemon zest while she watched from a stool, asking a hundred questions about why the flowers were safe to eat. Watching her face light up when I placed one in front of her, pastel buttercream and all, made every careful layer worth it.
I've learned that mini layer cakes are the secret weapon for celebrations when you want to impress without spending hours in the kitchen. A friend once told me she was intimidated by baking, so I walked her through this recipe over the phone while she worked through each step, and by the end, she was texting me photos of her creations with more confidence than she started with. It's become my go-to for birthday parties, tea gatherings, and those moments when you need something that looks like love on a plate.
Ingredients
- All-purpose flour (1 1/4 cups): The foundation that keeps these cakes tender and light; sift it if you have time, though whisking works in a pinch.
- Baking powder (1 tsp): Your lift and rise agent; don't skip it or your layers will be dense and disappointing.
- Salt (1/4 tsp): A quiet player that rounds out sweetness and makes the vanilla and lemon sing.
- Unsalted butter (1/2 cup for cake, 3/4 cup for buttercream): Room temperature is non-negotiable here; cold butter won't cream properly and you'll end up with a gritty texture.
- Granulated sugar (3/4 cup): Creamed with butter, it aerates the batter and gives you that tender crumb.
- Eggs (2 large): Bring them to room temperature by sitting them out for 20 minutes; cold eggs won't incorporate smoothly and can curdle the batter.
- Pure vanilla extract (1 tsp for cake, 1 tsp for buttercream): The difference between good and unforgettable; use real vanilla, not imitation.
- Lemon zest (1/2 tsp): Microplane it fresh right before mixing for maximum brightness and oils.
- Whole milk (1/2 cup): Room temperature helps it blend seamlessly and keeps the batter from breaking.
- Powdered sugar (2 cups): Sift before measuring so you don't end up with a thick, grainy frosting.
- Heavy cream or milk for buttercream (1–2 tbsp): Start with 1 tablespoon and add more only if needed; too much and your frosting becomes soupy.
- Edible flowers (1 cup): Source these from a reputable supplier who grows them specifically for consumption and without pesticides; violas and pansies are foolproof choices.
Tired of Takeout? 🥡
Get 10 meals you can make faster than delivery arrives. Seriously.
One email. No spam. Unsubscribe anytime.
Instructions
- Preheat and prepare your stage:
- Heat the oven to 350°F (175°C) and line a 9x13 inch rimmed baking sheet with parchment paper, then give it a light grease with butter or cooking spray. This prevents sticking and makes lifting your finished sheet cake out effortless.
- Combine your dry ingredients:
- Whisk together flour, baking powder, and salt in a medium bowl, letting air into the flour so your cake rises evenly. Set this aside and resist the urge to taste the raw flour.
- Cream butter and sugar until pale:
- In a large bowl with an electric mixer, beat softened butter and sugar for about 3 minutes until it looks like fluffy clouds and has lightened in color. This step aerates the batter and is worth the full time—don't rush it.
- Incorporate eggs one at a time:
- Add eggs individually, beating well after each one, then mix in vanilla extract and lemon zest until fully combined. The batter might look slightly broken at first, but keep beating and it will come together.
- Alternate wet and dry ingredients gently:
- Add half the flour mixture, mix gently until almost combined, then add the milk, then the remaining flour, mixing only until no streaks of flour remain. Overmixing develops gluten and makes the cake tough, so treat this step like you're being gentle with something fragile.
- Bake your sheet cake:
- Spread batter evenly onto the prepared sheet and bake for 18–22 minutes until a toothpick in the center comes out clean and the top is pale golden. Your kitchen will smell incredible.
- Cool completely before cutting:
- Let the cake sit on the baking sheet for 10 minutes, then turn it onto a wire rack to cool all the way through. Trying to cut warm cake is a recipe for crumbs and frustration.
- Cut out your mini cake rounds:
- Using a 2.5–3 inch round cutter, press straight down and twist slightly to release 12 perfect circles from your cooled sheet cake. If you're short a few, gently re-roll the scraps and cut again.
- Make your buttercream:
- Beat softened butter until creamy, then gradually add sifted powdered sugar, vanilla, a pinch of salt, and 1 tablespoon of milk, beating until light and fluffy. If it's too thick, add milk one teaspoon at a time until it spreads smoothly.
- Tint if desired:
- Add a drop or two of pastel food coloring if you want, stirring gently so you get an even tone without overworking the frosting. Pastels photograph beautifully and feel celebratory.
- Assemble each mini layer cake:
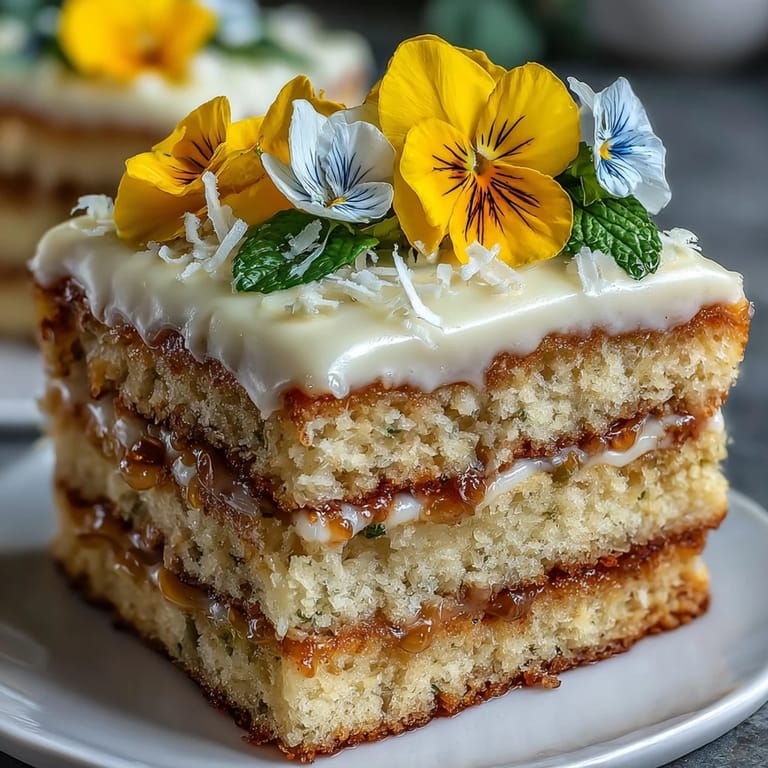
- Place one cake round on a plate, spread a thin layer of buttercream on top, then crown with a second cake round and another thin layer of frosting. The key is restraint—you're going for delicate, not drowning.
- Decorate the top with flowers:
- Pipe or spread a small rosette or dollop of buttercream on the top layer of each cake, then arrange your edible flowers artfully around and on top. Let your instincts guide you here; there's no wrong way to place a flower.
- Chill before serving:
- Refrigerate the finished cakes for at least 15 minutes so the buttercream sets and the whole thing holds together beautifully when cut. This rest also makes them easier to serve and eat.
 Save to Pins
 There was a moment during that birthday party when my niece carefully picked up her mini cake, studying the flower on top like it was a piece of edible art, then bit into it with such joy that everyone at the table went quiet. That's when I realized these cakes weren't just dessert—they were a memory in the making, something she'd remember not just as food but as a feeling. Since then, I've made them for engagements, anniversaries, and quiet Sunday afternoons when someone needed a little magic on their plate.
The Secret Behind Perfect Mini Cakes
The real trick to these cakes is understanding that they're delicate but not fragile—they need attention during assembly, but not anxiety. I once rushed through the buttercream step and ended up with something grainy that wouldn't spread properly, so now I take my time creaming the butter alone for a full minute before adding sugar. The difference between a cake that feels homemade-clumsy and one that feels homemade-intentional is patience in the small moments.
Sourcing Your Edible Flowers Responsibly
I made a mistake early on by assuming any pretty flower was fair game, and a friend's daughter had a mild reaction that scared me straight. Now I order my edible flowers from suppliers who specialize in them, usually online from places that can guarantee pesticide-free growing and proper handling. It adds a few dollars and requires planning ahead, but there's no price on peace of mind when you're feeding people you care about.
Variations and Personal Touches
Once you master the basic cake and buttercream, the variations are endless and entirely up to your mood. I've tinted buttercream in soft pinks, lavenders, and greens to match seasonal themes, brushed the cake layers with a light lemon simple syrup for extra moisture and zing, and even sandwiched a tiny spoonful of lemon curd between layers for guests who wanted that brightness amplified. The leftover cake scraps are gold—crumble them, mix with buttercream, and roll into cake pops, or freeze them for emergency trifle situations.
- Try a whisper of almond extract in the buttercream for a subtle, sophisticated shift in flavor.
- Layer a thin coat of raspberry or strawberry jam between the cake rounds for spring freshness and tartness.
- Keep extra cake rounds unfrosted and frozen for up to a week if you want to assemble these last-minute instead of all at once.
 Save to Pins
 These mini cakes have become my answer to every celebration that deserves something special but doesn't demand a full day in the kitchen. They're proof that homemade doesn't have to mean complicated, and that sometimes the most memorable desserts are the ones made with intention and a little bit of spring on top.
Questions & Answers
- → What types of edible flowers are best for decorating?
Violas, pansies, and nasturtiums are excellent for decoration as they are food-safe and add vibrant colors without overpowering flavors.
- → Can I prepare the buttercream in advance?
Yes, buttercream can be made ahead and stored in the refrigerator. Bring to room temperature before spreading for a smooth texture.
- → How do I ensure the cake layers stay moist?
Brush the layers lightly with a citrus syrup before assembling to add moisture and enhance the lemon flavor.
- → What is the best way to cut uniform mini cakes?
Use a 2.5–3 inch round cookie cutter to cut even, circular layers after baking and cooling.
- → Are there allergy considerations with edible flowers?
Yes, some edible flowers may cause allergic reactions. Verify each flower type and ensure they are pesticide-free and safe for consumption.